Snowfall looks harmless from the street, a soft cap on roofs and dormers. Up close, after a week of freeze and thaw, that snowpack behaves like a sponge pressed against heated shingles. Meltwater slides down until it hits the cold eaves, refreezes, and stacks into a ridge. That ridge is an ice dam, and once it forms, the water that should run off the roof backs up under shingles and into the house. Wet ceiling spots appear, then peeling paint, swollen trim, and stained insulation. I have seen a bathroom fan vent drip steadily into a vanity for days, and a bay window swell so badly the sash wouldn’t close. Those weren’t leaks from bad shingles, they were ice dam failures that started outside.
Homeowners usually find ice dams two ways. Either they see horns of ice drooling off the gutters, or they notice a brown stain spreading on a ceiling after a storm. Both moments come with the same question: Do I knock this ice off, or do I call someone who does roof ice dam removal for a living?
How ice dams actually form
Ice dams require three ingredients: a layer of snow, roof heat loss, and freezing temperatures at the eaves. Warm air leaks through gaps in ceilings, light fixtures, and attic hatches. That heat warms the roof deck from below. When sunlight or interior heat melts the bottom of the snowpack, water flows down-slope until it reaches the unheated overhang, then freezes. The ridge grows, and meltwater pools behind it.
The larger the temperature difference between the upper roof and the eaves, the faster dams build. Complex roofs with valleys, dormers, and recessed gutters create traps for snow and cold air, which makes them more vulnerable. So do north-facing slopes and shaded areas beneath big trees. Even a well-insulated attic can form dams if air leaks remain around can lights, vent stacks, and attic accesses. I have opened attic hatch covers and felt a strong draft of warm air rushing into the attic, proof that the ceiling is acting like a sieve.
Ventilation matters, but it is not a cure-all. A balanced system of soffit intake and ridge exhaust helps purge attic heat and moisture, which lowers the chance of snow melt at the upper roof. Still, if the ceiling beneath leaks air, stratified warm pockets will remain. Think of ventilation as a pressure release, not a substitute for a tight, insulated lid.
Warning signs before you see a stain
The earliest clues are outside. Look for icicles forming exclusively at the eaves and above soffits while the upper roof stays bare or slushy. Icicles that hang from the fascia or the back of gutters often mean meltwater is reaching the cold edge and refreezing. Inside, watch for frosty nails in the attic, damp insulation batts, or the sweet smell of wet wood when you open a scuttle. On the living side, cold exterior walls with warm ceilings can tell you the roof deck is being heated unevenly.
A less obvious sign lives in the utility bill. A winter spike in energy use without a change in thermostat settings can be a hint that warm air is dumping into the attic. That wasted energy feeds ice dams and costs money.
Immediate steps when an ice dam starts leaking
When water is coming through a ceiling, the priority is to control the water, relieve pressure if safe, and plan for removal. Move furniture, punch a small hole in a wet bubble to drain it into a bucket, and lay down plastic with towels. In the attic, if you can safely reach the underside of the roof, set a fan to move air across wet sheathing and pull back soggy insulation to let the wood dry. Save the insulation so you can reinstall it once dry.
Outdoor chiseling with hammers, axes, or shovels is a bad idea. Shingles are brittle in the cold and void warranties when they’re pried or scraped. Pouring rock salt on the roof stains siding and kills shrubs. I have replaced aluminum gutters that corroded in a single season after a homeowner used halite to melt an ice dam. Calcium chloride is less harmful than sodium chloride, but most de-icers shorten the life of asphalt shingles and plants below.
This is when a professional ice dam removal service earns its keep. They bring steam rigs, proper fall protection, and enough hose to reach long runs. If your house is leaking now, ask the scheduler for emergency ice dam removal. Reputable teams triage jobs by active water intrusion first.
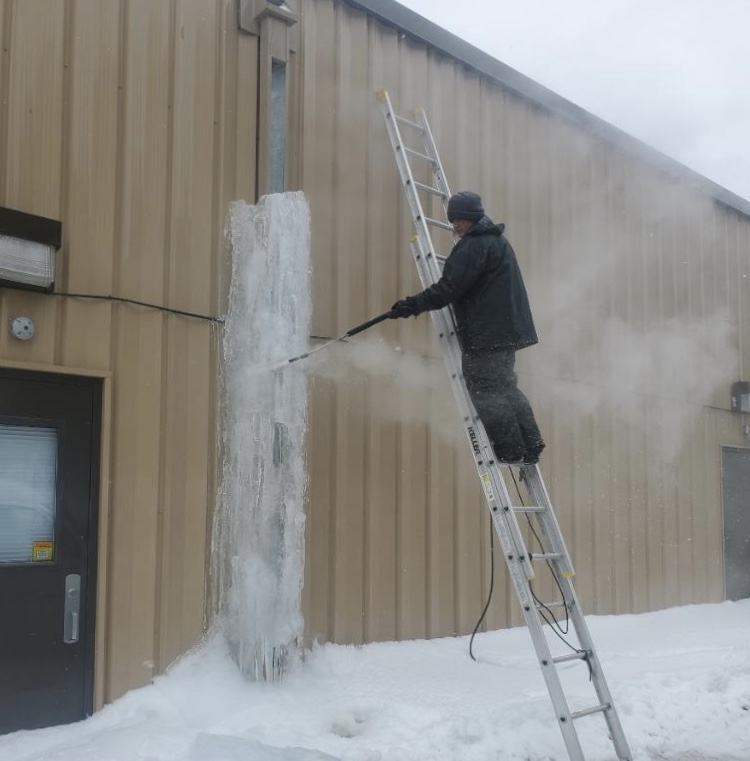
Steam, the gold standard for roof ice dam removal
I have tried every method across dozens of winters. Propane torches are dangerous near dry wood and asphalt, hot pressure washers shred granules, and blunt-force chopping damages shingles and flashing. Steam ice dam removal is safer for the roof and faster in experienced hands.
A steam unit heats water to a saturated steam, typically in the 240 to 300 degree Fahrenheit range at the tip, delivered through a wand that spreads the plume. The operator starts by cutting channels through the dam to relieve ponded roof snow removal water, then lifts the dam off in slabs by steaming the bond between ice and shingles. When done properly, the nozzle never touches the roof, and the shingle surface doesn’t get abraded. On a typical 40 to 60 foot eave with a moderate dam, two technicians and a trailer-mounted steamer might finish in two to four hours, depending on access, roof pitch, and the density of the ice.
The workflow matters. Good crews shovel excess snow back at least 4 to 6 feet from the eaves before steaming, which reduces refreeze and exposes the dam. They set roof anchors or use ridge hooks and ladders, rope off walkways, and assign one person to manage runoff so it does not flood entries or driveways. The best operators work methodically from the outer edge in, cutting drainage grooves every few feet first, then freeing the rest in sections. This minimizes water intrusion while they work.
What to expect from a professional ice dam removal visit
If you search “ice dam removal near me,” you will find a spread of equipment, pricing, and experience. Ask how they remove ice. If the answer is steam, ask the brand or BTU rating of the unit, whether it is a true saturated steamer or a hot-pressure washer. A hot-pressure washer runs at high PSI and can strip shingle granules, even if the water is hot. A steamer operates at low PSI with high heat, which melts bonds rather than blasting.
Expect a site assessment on arrival: roof pitch, access points, power availability for the unit if needed, where to stage hoses, and where to direct water. Many steam units run on fuel and do not need household power, but some smaller systems require a standard outlet. Ask about fall protection and insurance. reviews of commercial roof snow removal services If a crew cannot describe their tie-in plan or coverage, find someone else.
Costs vary by market and conditions. In most northern metros, ice dam removal cost typically ranges from 300 to 600 dollars per hour for a two-person crew with a steam rig, with a minimum charge around two hours. Dense, layered ice with embedded gutter helmets can push the time upward. So can three-story eaves, steep pitches, or deep snow that must be cleared before steaming. A simple ranch, accessible right off a driveway, might be on the lower end. Multi-gabled homes with valleys and limited access run higher.
When the crew finishes, insist on a walkthrough. Look for clear eaves, open gutters and downspouts, and snow cleared back from the edge. Inside, check the ceiling areas that were leaking. They will still be wet, but active dripping should have stopped once channels were cut and the dam removed. Ask for photos of the work area on the roof so you have a record.
DIY options when hiring is not possible
Not everyone can get an ice dam removal service the same day, and storms create backlogs. There are safe stopgaps while you wait.
Roof rakes with telescoping handles let you pull down the first three to four feet of snow from the edge while standing on the ground. Removing that snow layer lowers heat load at the eaves and can prevent further growth. Work carefully to avoid snagging shingles. Aluminum or plastic blades are kinder to roofing than steel.
Calcium chloride socks, made by filling a sleeve of fabric with pellets and laying it perpendicular to the eave, can melt narrow channels through a dam within a few hours. You might need several to create enough drainage. Use calcium chloride only, not rock salt, and keep it off stained wood, metal, or plants below. It is a temporary measure for a small section, not a cure for a 60 foot run.
If you must go on the roof, respect the risk. Ice and snow make falls far more likely. I have refused many jobs where the pitch and weather did not justify a climb. A cold day with bright sun and grippy footwear is safer than a warm day with glassy ice. When in doubt, stay on the ground and manage water indoors.
Preventive measures that actually work
Most ice dam problems trace back to heat escaping into the attic and a roof system that cannot shed that heat uniformly. Fix the building, and winter becomes easier.
Start with air sealing. Before adding insulation, block the pathways that leak warm air. Seal the attic hatch with weatherstripping and an insulated cover. Foam and caulk around plumbing stacks, electrical penetrations, bath fan housings, and top plates. Replace recessed lights that vent into the attic with sealed, insulation-contact rated fixtures or remodel trims with gasketed covers. Use fire-safe methods around chimneys and flues, adding sheet metal and high-temperature sealant to maintain clearances.
Add insulation after air sealing. In cold climates, most attics benefit from R-49 to R-60, which usually means 14 to 20 inches of loose-fill cellulose or blown fiberglass, or a combination if you are topping existing batts. Dense-pack cellulose in kneewalls and sloped ceilings reduces convective loops that keep those areas warm. Avoid burying active knob-and-tube wiring and maintain clearance around non-IC rated fixtures.
Balance attic ventilation. Clear soffit vents of insulation by installing baffles in every bay that leads to the eaves. Confirm that ridge vents are continuous and unobstructed, or add gable or roof vents if the architecture prevents a continuous ridge. Intake should equal or exceed exhaust area. Where cathedral ceilings make ventilation impossible, consider unvented assemblies with spray foam if you are remodeling, but treat that as a targeted project, not a casual weekend job.
Mind the mechanicals. Bathroom fans should exhaust outdoors, not into the attic or soffit. I have seen ice bloom above a bathroom where steam was vented into an attic cavity. Kitchen range hoods should vent outside as well. Ducts in unconditioned spaces should be insulated and sealed at joints to prevent warm leaks.
If you have a history of stubborn ice on a high-pitch north slope, heat cables can serve as a backup. They are not a license to ignore air leaks and insulation, but when installed correctly in zigzag patterns along eaves and in problem valleys, they keep channels open and reduce ridging. Use self-regulating, outdoor-rated cables on a dedicated, GFCI-protected circuit, and set them on a timer or temperature controller so they run only when needed.
Finally, maintain the exterior. Clean gutters in the fall so meltwater has somewhere to go. Though gutters do not cause ice dams by themselves, clogged gutters turn manageable ridges into iceberg shelves that hold water. Trim trees that shade the roof after storms to give the sun a chance to work.
How prevention changes the economics
A two-person crew steaming ice for four hours at 450 dollars per hour costs 1,800 dollars before tax. If you need that service twice in one winter, you have paid for a professional air-sealing and insulation upgrade in many homes. A blower-door guided air sealing job paired with adding R-38 to R-49 of insulation in a typical attic often lands between 2,000 and 5,000 dollars, depending on access and size. That project also lowers heating costs every winter and makes summer rooms less stuffy. I have watched utility bills drop 10 to 25 percent after comprehensive air sealing and insulation, which compounds the benefit beyond fewer ice dams.
Ice dam insurance claims frequently include interior repairs. A small ceiling patch might be a few hundred dollars. Rip out and replace wet drywall, repaint a room, refinish casing, and the bill can hit several thousand. Wood floors cup and need sanding. Insulation that has soaked through fiberglass or cellulose must be pulled, bagged, and replaced. Mold risk grows when wet materials stay closed up. All of that tilts the math toward prevention.
What happens if you ignore a dam
Water moves in ways it should not once it gets under shingles. It runs along the underside of the roof deck, finds nail holes, and drips into the insulation. If the leak sits over a light fixture, it can short the circuit or corrode the housing. Ice expands in gutters and can twist hangers, bend fascia, and pull fasteners from the rafter tails. Overhangs that stay wet freeze, thaw, and loosen paint down to bare wood. In the attic, persistent moisture creates frost on nails which melts on warm days, raining on the insulation even when the roof is dry.
I have opened soffit boxes in spring and found blackened sheathing from a winter of slow leaks. The paint outside looked fine. The damage was hidden until the carpenter pulled the plywood. One season of neglect isn’t always catastrophic, but repeated cycles carve channels and rot paths that are costly to correct.
When to schedule work and who to hire
The best time to prevent ice dams on roof assemblies is late summer through early fall, when attics are accessible and crews are not booked with snow emergencies. An energy auditor with a blower door and infrared camera can pinpoint leaks that a casual inspection misses. Pair that diagnostic with a contractor skilled in air sealing and insulation. If your roof is due for replacement anyway, ask the roofer to upgrade ventilation, add an ice and water shield along eaves at least to 24 inches inside the exterior wall plane, and correct weak spots around valleys and penetrations.
For removal, prioritize companies that focus on residential ice dam removal with steam equipment and safety practices. Ask for proof of insurance, references from recent storms, and whether they photograph before and after. Local outfits tend to arrive faster during a regional event, but a well-equipped regional company with several steam rigs may offer better response for emergency ice dam removal during peak weeks. Either way, clear access to driveways and a spot to park a trailer helps speed the job.
A realistic plan for the next storm
Homeowners want a simple checklist they can follow when snow arrives. The habits are straightforward. After the first big snow, rake the lower three feet of the roof from the ground if your design allows it. Keep gutters clear in the fall so meltwater drains. Watch for icicles forming in clusters rather than evenly along the eave, a sign of localized heat leaks. If you spot a dam, call for professional ice dam removal early, even if it is not leaking yet. Crews book quickly, and removing ice before water backs up is cheaper and easier.
For the house itself, commit to sealing and insulating the attic before winter. That single project addresses the root cause better than any gadget. If a stubborn north valley still ices up after improvements, add a short run of heat cable on a controller as a failsafe. Reassess after a season. Often, one winter with proper air sealing shows you which remaining details need attention.
My field notes on common myths
People fixate on gutters. They help shape the ice, yes, but the real driver is heat from below. I have pulled 12 inches of ice off eaves on houses with no gutters at all. Do not waste money on gutter covers as an ice dam solution. Some designs actually make dams worse by trapping snow at the edge.
Dark shingles do not cause ice dams. They absorb sunlight and can accelerate melt on sunny days, but without attic heat loss there is no persistent water flow to refreeze at the eaves. Conversely, a white metal roof can still form dams at a cold overhang if the attic is leaky and the snowpack is thick.
Salt is not a strategy. Calcium chloride socks in careful, short-term use are a stopgap. Broadly spreading de-icers on the roof or in gutters is hard on materials and landscaping. Focus energy on removing snow and releasing water with steam where needed.
Ventilation without air sealing only goes so far. I have seen well-vented attics with textbook baffles and ridge vents still grow dams because recessed lights and bath fans pumped heat into the roof deck. Seal first, vent second, insulate third, in that order.
Where steam fits in the bigger picture
Steam is not a magic wand, but it is the best acute treatment we have. It minimizes roof damage, works in a wide range of conditions, and gets water moving off the roof during the storm cycle that caused the problem. Think of it like a plumber’s jetter for a clogged drain. It clears the blockage so you can use the system safely while you plan a permanent fix. Professional ice dam removal by steam, paired with targeted building improvements, turns a recurring winter crisis into an occasional maintenance task.
The homeowners who come through winter with dry ceilings follow the same pattern. They call early when ice appears rather than waiting for indoor damage. They invest once in sealing the lid of the house and adding the right amount of insulation. They keep snow from piling at the edge when storms line up on the forecast. And when they need help, they look for a crew that treats their roof like a system, not a battleground.
If you are staring at a ridge of ice right now, triage the leak, order steam, and take photos inside and out for your records. When the weather breaks, schedule an energy audit and get quotes for air sealing and insulation. Next winter, your roof will shed snow without drama, and the only icicles you will see will be the small, ornamental ones on the tips of the holiday lights.